
Start free trial Webinars Certifications Catalog

Create team inboxes

Set up team inboxes so Fin routes escalated conversations to the right people with the right assignment method.

rate limit

Code not recognized.

About this course


With Fin handling part or all of your frontline support, your team will mainly receive more complex and nuanced cases that require specific expertise to resolve. That shift changes how you configure your inbox.

Your old inbox might have been organized by channel or volume tier and relied heavily on manual reassignment. In AI-first support, your inbox needs to enable seamless escalations to the person who can really help.

This lesson is part of the Setting up your AI-first helpdesk course.

Prerequisites

Before setting up your team inboxes, make sure you have the following in place.

  • Admin access to Intercom: You’ll need permission to create and manage team inboxes in Settings > Inbox > Team Inboxes.
  • A plan for your escalation paths: Know which specialist teams will handle Fin’s escalations. If you’ve completed the Map your support experience exercise earlier in this course, you’re ready.

Video transcript

When Fin escalates a conversation, it should route it straight to the right team who can help, which means each team you route to needs its own inbox. Topic or skills based team inboxes are the most common approach. For example, payment queries can be routed to the billing team, pricing questions to sales, technical issues to support, account lockouts to security, and so on. On top of this, you could prioritize urgent queries in their own inbox, so any available teammate can respond quickly. It's also worth considering dedicated inboxes for specific customer segments, such as VIP customers if you want them to receive a tailored experience from a dedicated team. Whatever inboxes you choose, don't forget to include a general support inbox to catch anything that doesn't fit neatly into these categories. So every conversation has somewhere to go. Follow me while we set up a team inbox. Let's click on Team inboxes and New team inbox, and we'll make this one our billing team's inbox. And we can select every member of that team to add them here. We'll set the assignment method, which is how conversations are distributed among members of this team. Manual assignment means conversations sit unassigned until someone picks them up. This can suit teams who handle support intermittently alongside of the responsibilities, but it can lead to slower response times. Round Robin distributes sequentially, which is a great choice for sales and lead routing where quick responses matter the most. But for support teams, balanced assignments is usually the best fit. It routes each new conversation to the teammate with the fewest open conversations, helping keep workloads even since some issues take longer to resolve than others. And let's set the limit to three so conversations distribute evenly from the start and our teammates aren't overwhelmed. And here is where you set the team's office hours. If this inbox is managed 24/7 by a global team, we can set it to Always On. Click save, And there's our billing team's inbox. You don't need to define every possible team upfront. For now, create inboxes for the key use cases you've identified, and you can expand from there over time. Okay. So these will be our first set of landing zones for conversations escalated by Fin. Let's take a look. Oh, it's empty. Well, that's not surprising. We haven't yet built out the logic which will route conversations from Fin to each of these teams. In later lessons, we'll look at exactly how to do that using things like customer data, Fin attributes and workflows. So that when Fin hands over a conversation, it lands exactly where it should and your customers receive a seamless support experience.


Create your team inboxes

Go to Settings > Inbox > Team Inboxes and create one inbox per major escalation type. Common starting sets include:

  • Billing
  • Technical
  • VIP
  • Onboarding

Avoid channel-based names (e.g. Chat, Email) or tier-based names (e.g. Tier 1, Tier 2). Those reflect the old model, where volume determined structure. Name your inboxes by expertise instead.

Important: Multiple team inboxes require an Advanced or Expert plan. If you’re on Essential, you’ll work from a single shared inbox and can restructure as your plan scales.

Each inbox can have its own office hours, assignment method, and SLA.


Teammate visibility

Each teammate can see conversations in the inboxes they belong to. You’ll add teammates to their relevant team inboxes later, when you invite the team.


Service level agreements (SLAs)

SLAs define the response time targets for your team, ensuring a consistent and high-quality experience. You can set different SLAs for different customer segments or escalation paths.
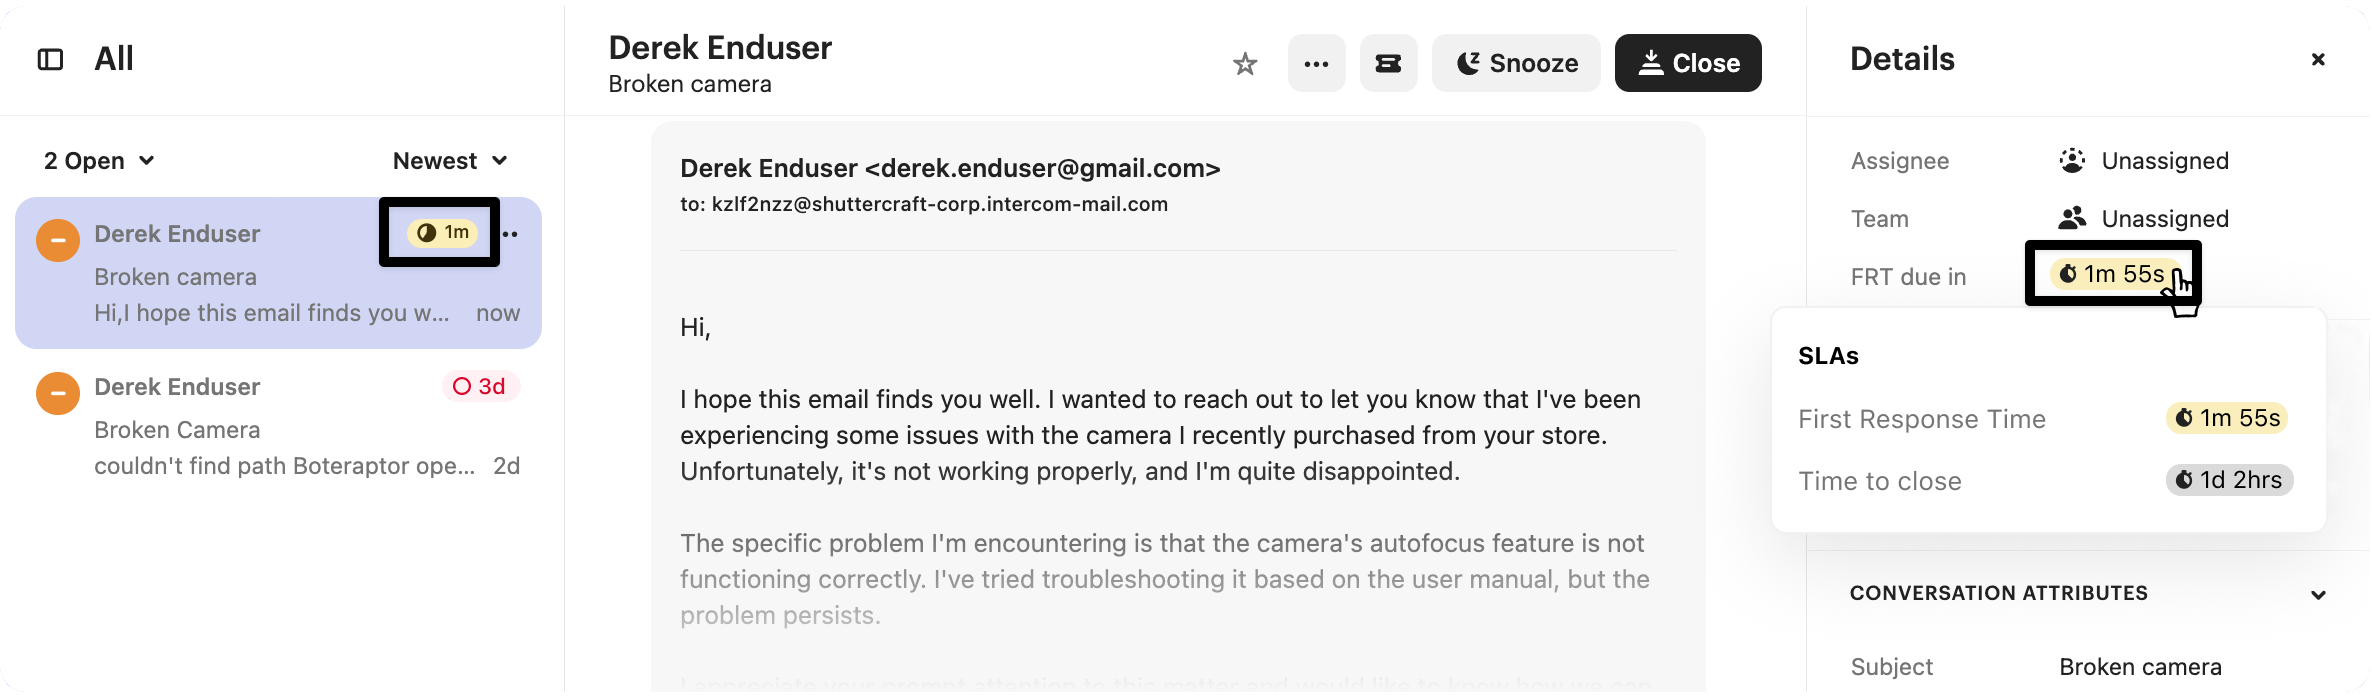
SLA configuration example

You set up SLAs using Workflows when you define your routing logic, which is covered later in this course.


Resources


What’s next?

You now know how to structure your team inboxes around expertise rather than volume, so what now?

Continue setting up your helpdesk...

Next up: organizing your inbox with Views, configuring macros, and inviting your team. Everything you need is in the Setting up your AI-first helpdesk course.
πŸ‘‰ Take the course

About this course


With Fin handling part or all of your frontline support, your team will mainly receive more complex and nuanced cases that require specific expertise to resolve. That shift changes how you configure your inbox.

Your old inbox might have been organized by channel or volume tier and relied heavily on manual reassignment. In AI-first support, your inbox needs to enable seamless escalations to the person who can really help.

This lesson is part of the Setting up your AI-first helpdesk course.

Prerequisites

Before setting up your team inboxes, make sure you have the following in place.

  • Admin access to Intercom: You’ll need permission to create and manage team inboxes in Settings > Inbox > Team Inboxes.
  • A plan for your escalation paths: Know which specialist teams will handle Fin’s escalations. If you’ve completed the Map your support experience exercise earlier in this course, you’re ready.

Video transcript

When Fin escalates a conversation, it should route it straight to the right team who can help, which means each team you route to needs its own inbox. Topic or skills based team inboxes are the most common approach. For example, payment queries can be routed to the billing team, pricing questions to sales, technical issues to support, account lockouts to security, and so on. On top of this, you could prioritize urgent queries in their own inbox, so any available teammate can respond quickly. It's also worth considering dedicated inboxes for specific customer segments, such as VIP customers if you want them to receive a tailored experience from a dedicated team. Whatever inboxes you choose, don't forget to include a general support inbox to catch anything that doesn't fit neatly into these categories. So every conversation has somewhere to go. Follow me while we set up a team inbox. Let's click on Team inboxes and New team inbox, and we'll make this one our billing team's inbox. And we can select every member of that team to add them here. We'll set the assignment method, which is how conversations are distributed among members of this team. Manual assignment means conversations sit unassigned until someone picks them up. This can suit teams who handle support intermittently alongside of the responsibilities, but it can lead to slower response times. Round Robin distributes sequentially, which is a great choice for sales and lead routing where quick responses matter the most. But for support teams, balanced assignments is usually the best fit. It routes each new conversation to the teammate with the fewest open conversations, helping keep workloads even since some issues take longer to resolve than others. And let's set the limit to three so conversations distribute evenly from the start and our teammates aren't overwhelmed. And here is where you set the team's office hours. If this inbox is managed 24/7 by a global team, we can set it to Always On. Click save, And there's our billing team's inbox. You don't need to define every possible team upfront. For now, create inboxes for the key use cases you've identified, and you can expand from there over time. Okay. So these will be our first set of landing zones for conversations escalated by Fin. Let's take a look. Oh, it's empty. Well, that's not surprising. We haven't yet built out the logic which will route conversations from Fin to each of these teams. In later lessons, we'll look at exactly how to do that using things like customer data, Fin attributes and workflows. So that when Fin hands over a conversation, it lands exactly where it should and your customers receive a seamless support experience.


Create your team inboxes

Go to Settings > Inbox > Team Inboxes and create one inbox per major escalation type. Common starting sets include:

  • Billing
  • Technical
  • VIP
  • Onboarding

Avoid channel-based names (e.g. Chat, Email) or tier-based names (e.g. Tier 1, Tier 2). Those reflect the old model, where volume determined structure. Name your inboxes by expertise instead.

Important: Multiple team inboxes require an Advanced or Expert plan. If you’re on Essential, you’ll work from a single shared inbox and can restructure as your plan scales.

Each inbox can have its own office hours, assignment method, and SLA.


Teammate visibility

Each teammate can see conversations in the inboxes they belong to. You’ll add teammates to their relevant team inboxes later, when you invite the team.


Service level agreements (SLAs)

SLAs define the response time targets for your team, ensuring a consistent and high-quality experience. You can set different SLAs for different customer segments or escalation paths.

SLA configuration example

You set up SLAs using Workflows when you define your routing logic, which is covered later in this course.


Resources


What’s next?

You now know how to structure your team inboxes around expertise rather than volume, so what now?

Continue setting up your helpdesk...

Next up: organizing your inbox with Views, configuring macros, and inviting your team. Everything you need is in the Setting up your AI-first helpdesk course.
πŸ‘‰ Take the course
