Start free trial Webinars Certifications Catalog

Installing and customizing the Fin Messenger

Install, secure, and brand your Messenger so customers get a great first impression of Fin.

rate limit

Code not recognized.

About this course


For many customers, the Intercom Messenger will be their very first experience with Fin. That first interaction sets the tone, so it’s worth taking the time to get it right.

This lesson is part of the Setting up your AI-first helpdesk course.

Prerequisites

Before you begin, make sure you have the following in place:

  • Admin access: You need permissions to manage Messenger and security settings in your Intercom workspace.
  • Access to your website or app codebase: Installing the Messenger involves adding a code snippet to your site. If you’re not comfortable with this, you can invite a developer from the Install page to help.

Step 1: Install the Messenger

Go to Settings → Channels → Messenger → Install → Install for web.

Installing the Intercom Messenger on your website or app can involve some technical setup. To make the process smoother, you can invite teammates from the Install page to help complete the setup steps.
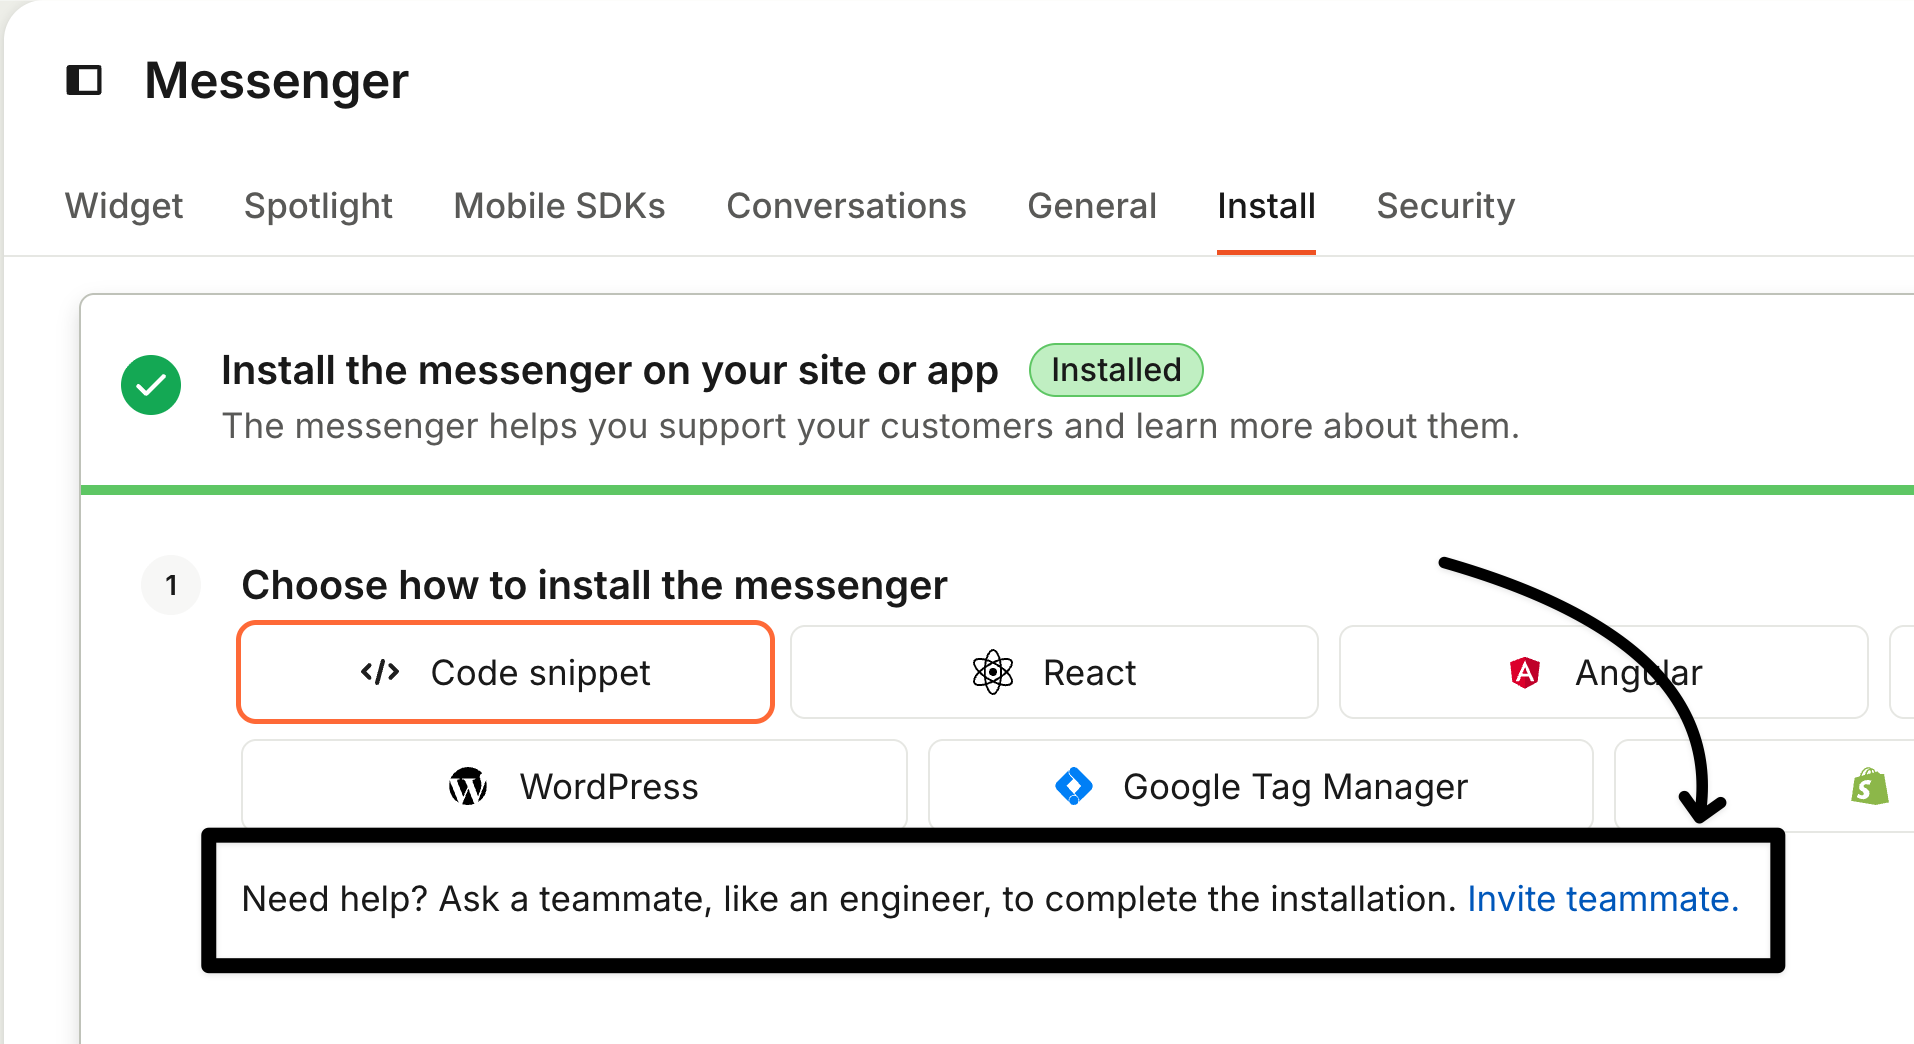
Invite teammates to help with Messenger installation

Choose your installation method based on how your site or app is built:

Method Best for
Code snippet Any website: paste before the </body> tag
React / Angular / Vue / Ember Framework-based web apps
WordPress / Shopify CMS and ecommerce sites
Google Tag Manager / Segment No-code deployment via tag managers

What to pass in the snippet

For logged-in users, pass at minimum: user_id, email, name, and created_at (signup date as a Unix timestamp). If both user_id and email are provided, Intercom prioritizes user_id.

For visitors and leads, you don’t need to pass user data. Intercom identifies them via browser cookies automatically.

Verify your installation: Use the “Check installation” button in the same settings area to confirm the Messenger is actually loading on your site.

Note: If you’re in an EU or AU workspace, you’ll need to add an api_base parameter with region-specific endpoints. The installation article linked in the Resources section has the exact parameter values.


Step 2: Secure the Messenger with JWTs

Without Messenger Security in place, anyone who knows a user’s identifier (such as their email address or user ID) can impersonate that user and access their conversation history. Intercom mitigates this by limiting unsecured Messengers to only showing the most recent 14 days of conversation history, but that’s a safety net, not a solution.

How to implement Messenger Security

  1. Go to: Settings → Messenger → Security
  2. Generate JWTs server-side using your Messenger API Secret and a standard JWT library. Your secret key should never appear in frontend code.
  3. Add the token to the Messenger snippet by including the intercomUserJwt parameter. Every JWT must include user_id in the payload.
  4. Set a short token expiry: a minimum of 5 minutes is recommended, long enough for a full request to be processed.
  5. Disable insecure updates for protected attributes in Settings → Data → People.
  6. Enforce security by toggling the requirement on in Settings → Messenger → Security.
  7. Call Intercom(’shutdown’) on logout: session cookies last 7 days by default. If you don’t clear the session when users log out, the next person on a shared device inherits access.

The most important implementation rule: Messenger Security must be set up everywhere logged-in users can trigger the Messenger, not just on your main support page.

Note: If your workspace currently uses the older Identity Verification (HMAC) method, Intercom recommends migrating to JWTs. Identity Verification is deprecated but still functional.


Step 3: Customize the Messenger appearance

Under Settings → Messenger → Web → Content, you can customize the spaces that appear to your customers. Choose whether you want the Messenger to launch straight into a conversation with Fin, or to show a Home screen first. The experience can be tailored differently for users and visitors. Read more about Spaces on the Help Center.

Under Settings → Messenger → Web → Appearance, you can adjust the appearance of your Messenger to express your brand and the customer experience you want to create.
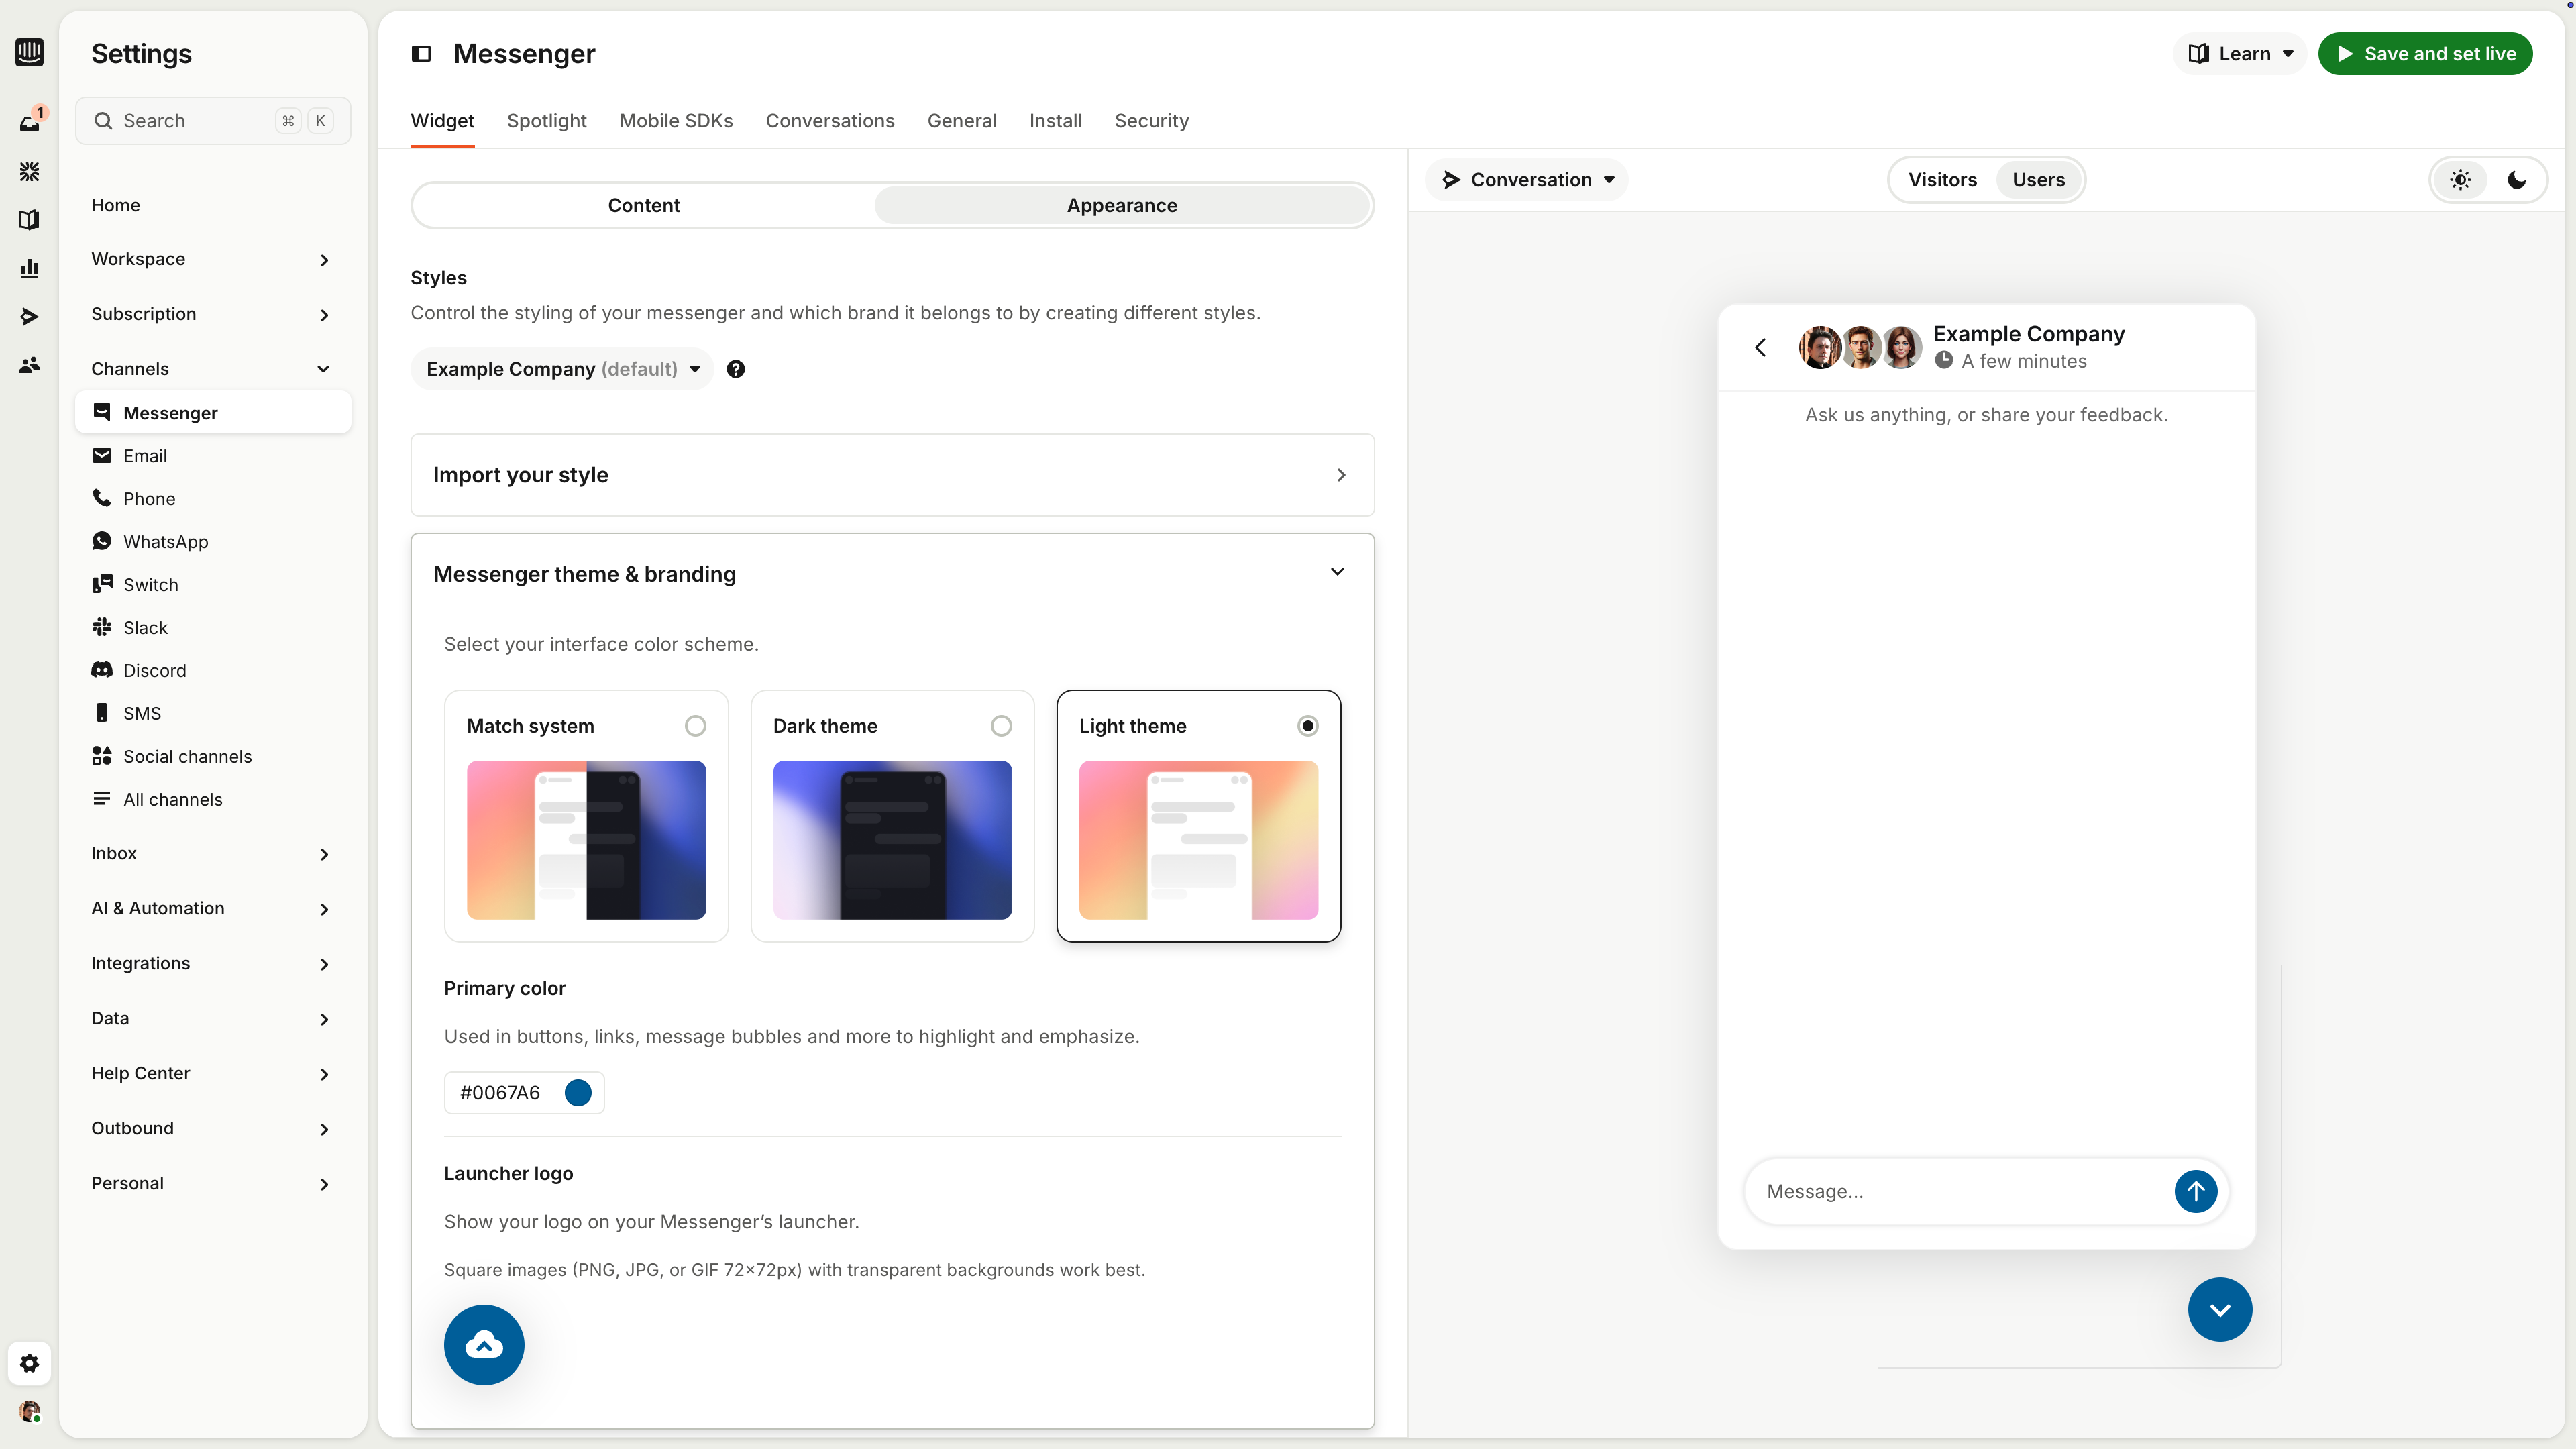
Messenger appearance settings in Intercom

Six settings control the Messenger style:

  • Messenger theme: choose light, dark, or match system (follows the customer’s device preference)
  • Primary color: used in buttons, links, message bubbles, and more to highlight key elements
  • Home Screen logo: add a PNG, JPG, or GIF for the Messenger Home header (may be resized to fit)
  • Launcher logo: shown on the Messenger launcher button. Square images (72x72px) with transparent backgrounds work best
  • Home Screen background: choose between a solid color, gradient, or uploaded image
  • Header text color: set to black or white depending on your background choice

Match these to your existing brand guidelines so that the Messenger feels like an integral part of your website.

Import your style directly from your website

If your workspace was created after December 2023, you can use the Import your style option to automatically pull your brand logo and colors from your website. Enter your domain, click Import, and Intercom will detect your brand colors and logo for you.
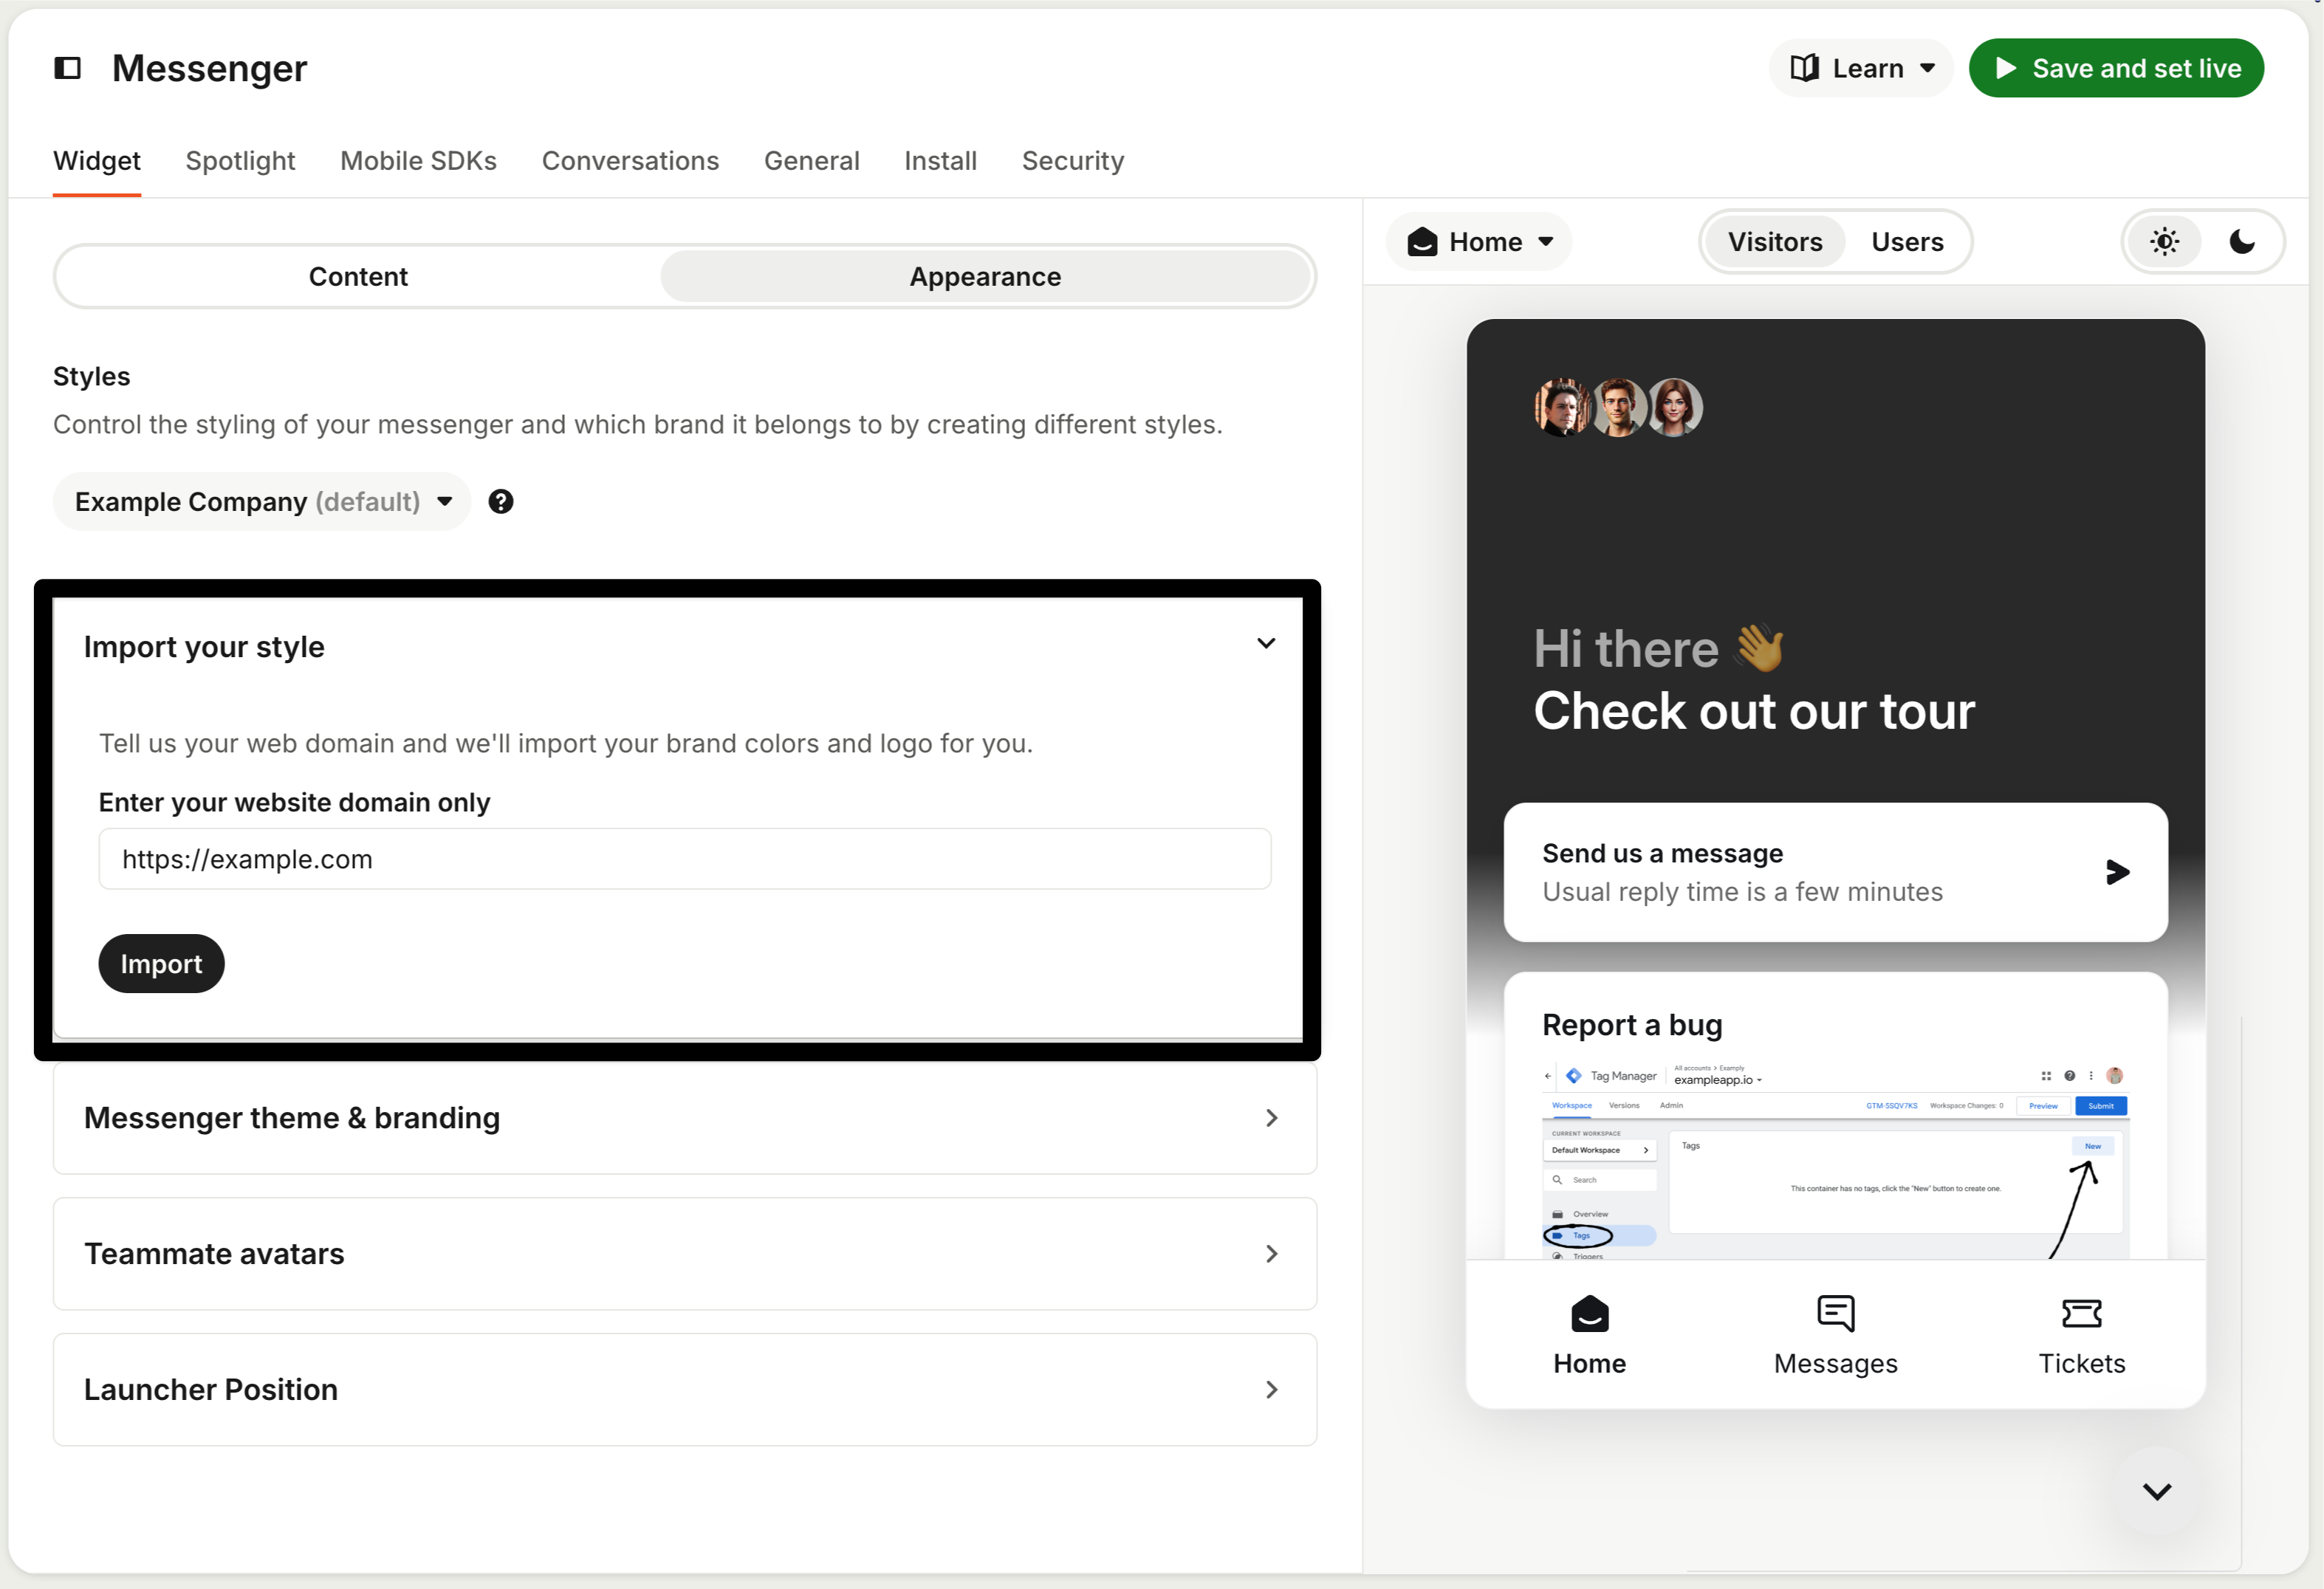
Import your style option in Messenger settings


Step 4: Configure Fin’s identity

You can change Fin’s default identity to make it part of your own brand. Go to Fin AI Agent → General → Fin settings.

Here you can change Fin’s name and avatar to reflect your brand. This is the name and icon your customers see on every message Fin sends.
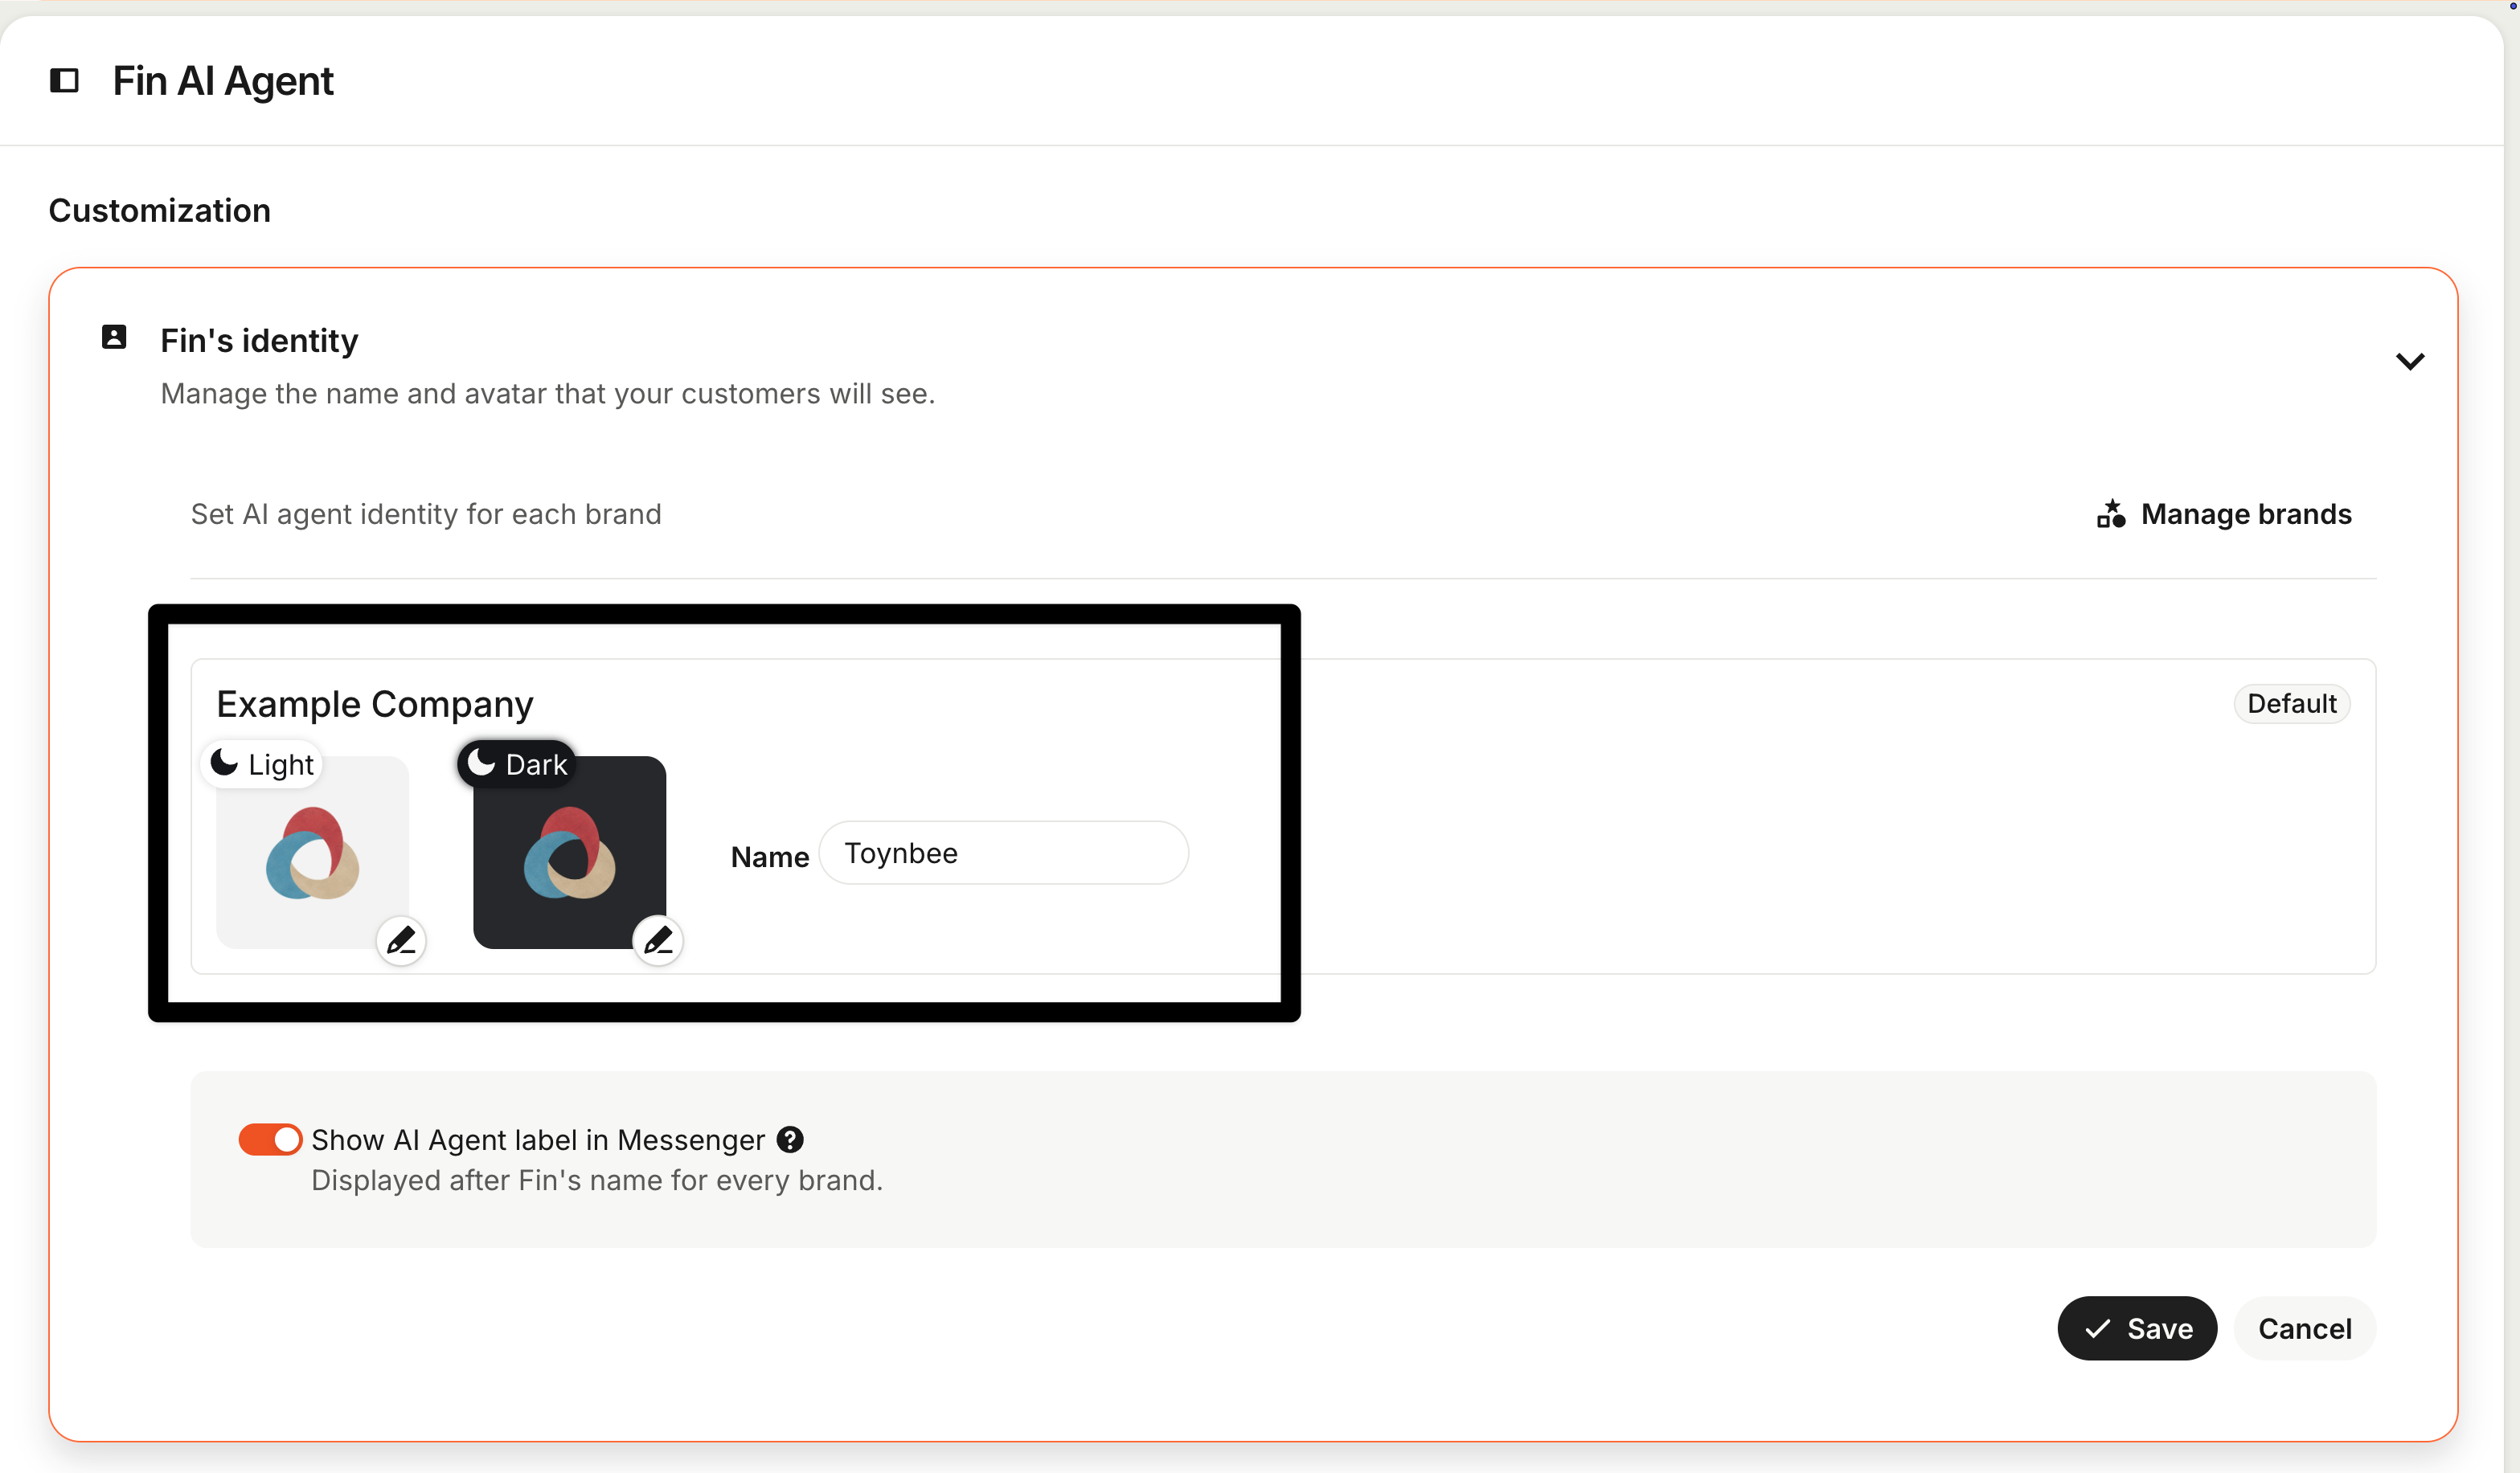
Fin name and avatar settings

A practical tip: make sure the avatar contrasts well with your chosen Messenger background color.

AI Agent label: This toggle controls whether a label appears below each message Fin sends, indicating it was AI-generated. It is on by default for new customers, and in most cases you should leave it on. Learn more about AI disclosure on the Help Center.

If you’re running multiple brands: each brand can have its own Fin name, avatar, and Messenger appearance. If no brand-specific identity is configured, Fin falls back to your workspace default.


Step 5: Test before going live

Preview the Messenger and run an internal test before you set it live for customers.

Preview

Use the interactive preview at Fin AI Agent → Deploy → Chat. This lets you send test messages and see exactly how Fin responds in the actual Messenger interface.
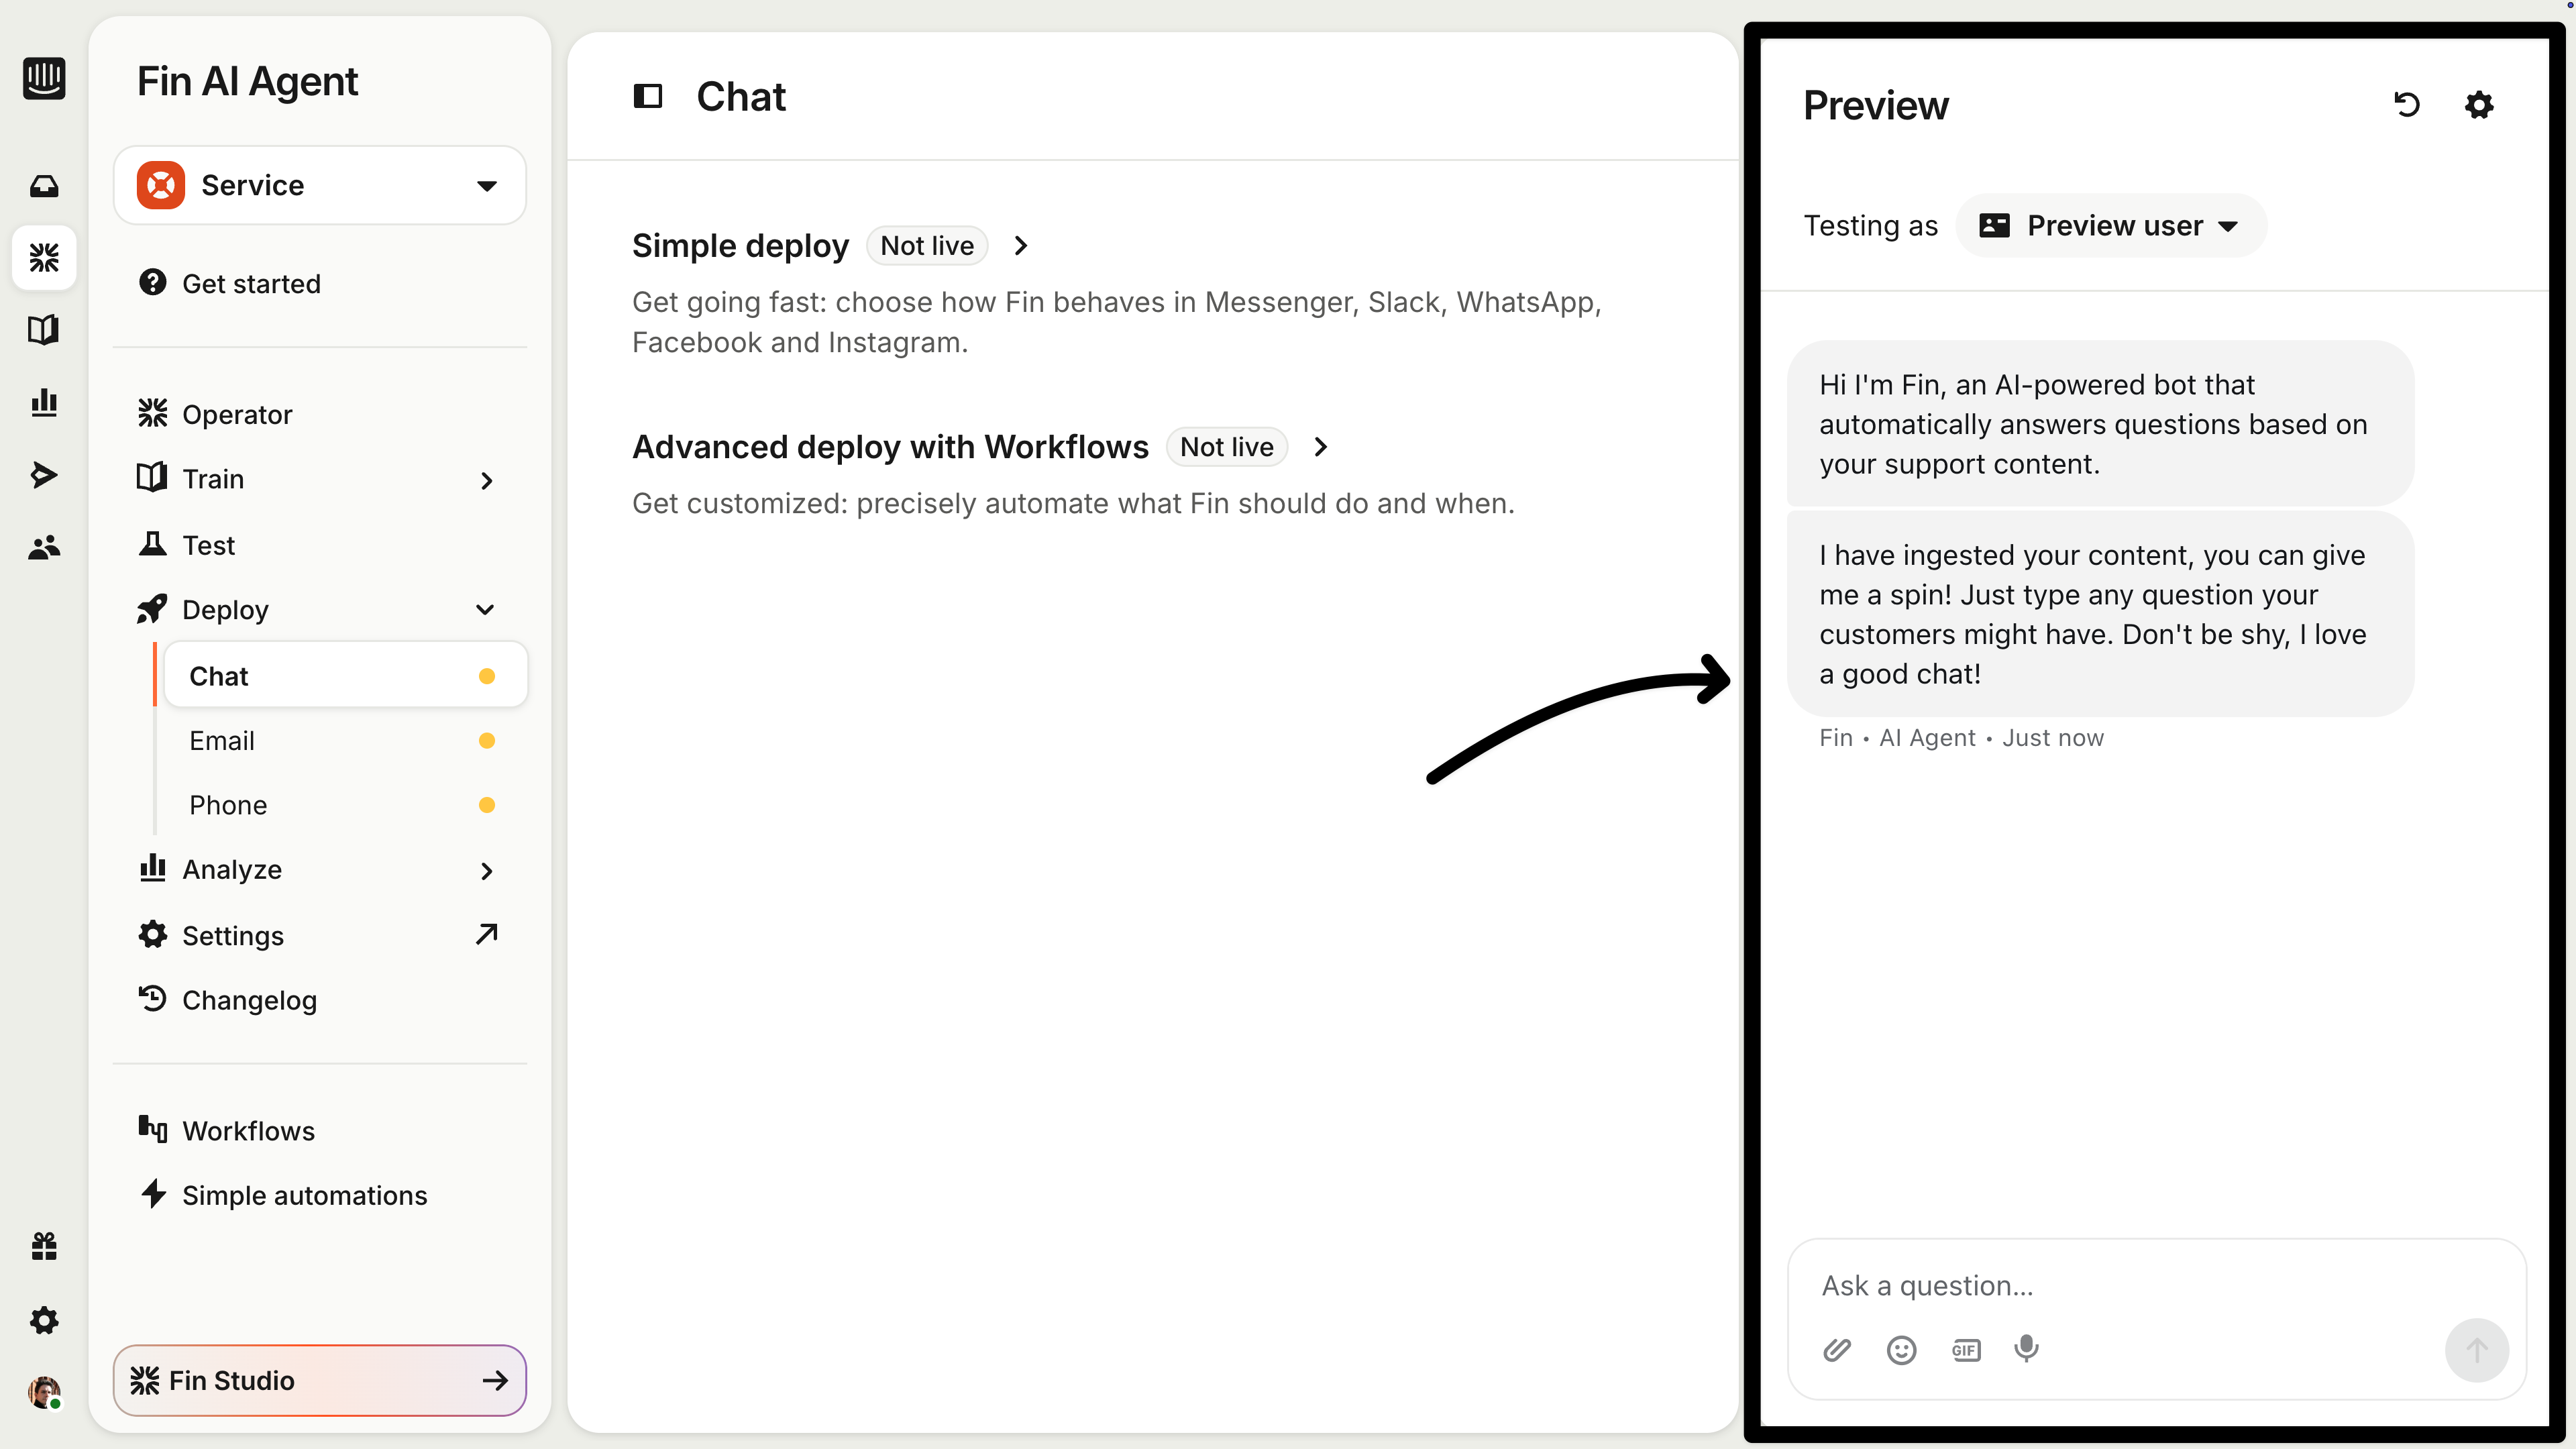
Fin AI Agent preview in the Messenger

Check:

  • Fin answers your most common questions accurately
  • The escalation path works (test a scenario that should hand off to a human)
  • The name, avatar, and colors are appearing as expected
  • The AI Agent label is showing (if enabled)

Internal test

Then, run an internal test. Set your audience rules to target teammates only. The most common approach: use an audience condition where email contains @yourcompany.com. This limits the live Messenger to people on your team while you verify the experience.
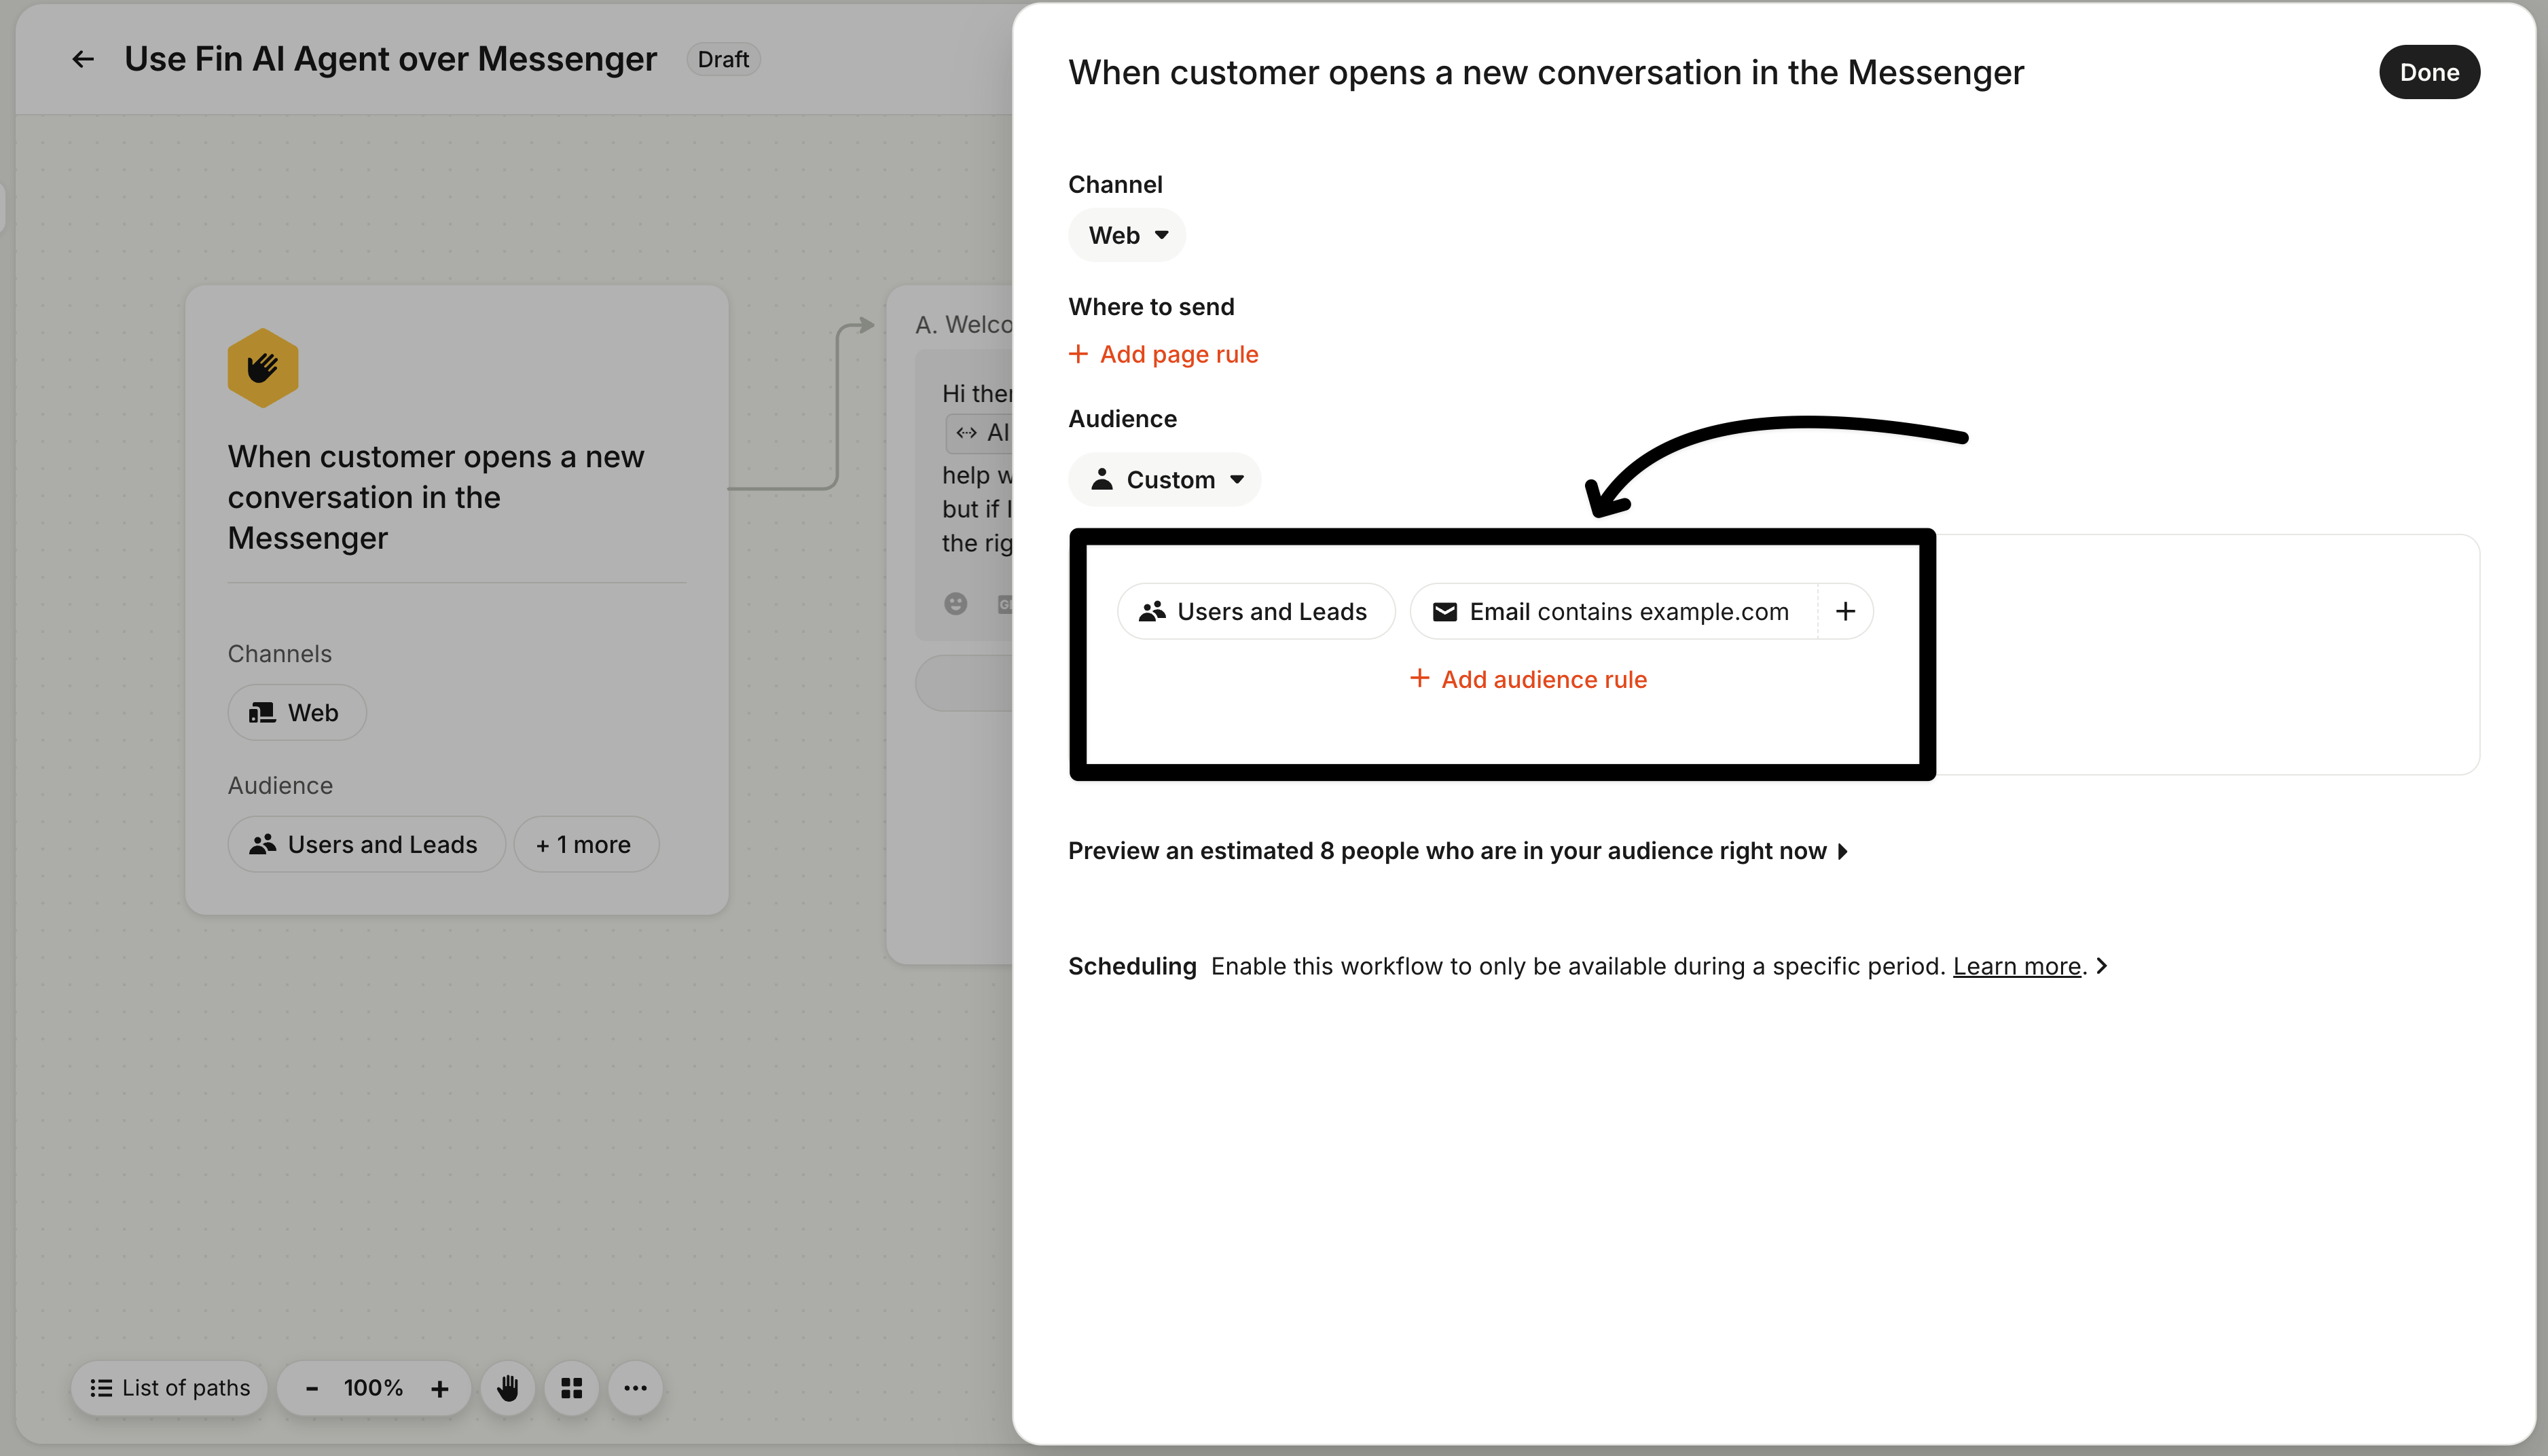
Audience rule filtering by email domain for internal testing


Resources


What’s next?

Your Messenger is installed, secured, branded, and tested. Now it’s time to keep building out the rest of your helpdesk.

Continue the course...

Keep setting up your AI-first helpdesk, from connecting email to optimizing your knowledge base and beyond.
πŸ‘‰ Setting up your AI-first helpdesk

About this course


For many customers, the Intercom Messenger will be their very first experience with Fin. That first interaction sets the tone, so it’s worth taking the time to get it right.

This lesson is part of the Setting up your AI-first helpdesk course.

Prerequisites

Before you begin, make sure you have the following in place:

  • Admin access: You need permissions to manage Messenger and security settings in your Intercom workspace.
  • Access to your website or app codebase: Installing the Messenger involves adding a code snippet to your site. If you’re not comfortable with this, you can invite a developer from the Install page to help.

Step 1: Install the Messenger

Go to Settings → Channels → Messenger → Install → Install for web.

Installing the Intercom Messenger on your website or app can involve some technical setup. To make the process smoother, you can invite teammates from the Install page to help complete the setup steps.

Invite teammates to help with Messenger installation

Choose your installation method based on how your site or app is built:

Method Best for
Code snippet Any website: paste before the </body> tag
React / Angular / Vue / Ember Framework-based web apps
WordPress / Shopify CMS and ecommerce sites
Google Tag Manager / Segment No-code deployment via tag managers

What to pass in the snippet

For logged-in users, pass at minimum: user_id, email, name, and created_at (signup date as a Unix timestamp). If both user_id and email are provided, Intercom prioritizes user_id.

For visitors and leads, you don’t need to pass user data. Intercom identifies them via browser cookies automatically.

Verify your installation: Use the “Check installation” button in the same settings area to confirm the Messenger is actually loading on your site.

Note: If you’re in an EU or AU workspace, you’ll need to add an api_base parameter with region-specific endpoints. The installation article linked in the Resources section has the exact parameter values.


Step 2: Secure the Messenger with JWTs

Without Messenger Security in place, anyone who knows a user’s identifier (such as their email address or user ID) can impersonate that user and access their conversation history. Intercom mitigates this by limiting unsecured Messengers to only showing the most recent 14 days of conversation history, but that’s a safety net, not a solution.

How to implement Messenger Security

  1. Go to: Settings → Messenger → Security
  2. Generate JWTs server-side using your Messenger API Secret and a standard JWT library. Your secret key should never appear in frontend code.
  3. Add the token to the Messenger snippet by including the intercomUserJwt parameter. Every JWT must include user_id in the payload.
  4. Set a short token expiry: a minimum of 5 minutes is recommended, long enough for a full request to be processed.
  5. Disable insecure updates for protected attributes in Settings → Data → People.
  6. Enforce security by toggling the requirement on in Settings → Messenger → Security.
  7. Call Intercom(’shutdown’) on logout: session cookies last 7 days by default. If you don’t clear the session when users log out, the next person on a shared device inherits access.

The most important implementation rule: Messenger Security must be set up everywhere logged-in users can trigger the Messenger, not just on your main support page.

Note: If your workspace currently uses the older Identity Verification (HMAC) method, Intercom recommends migrating to JWTs. Identity Verification is deprecated but still functional.


Step 3: Customize the Messenger appearance

Under Settings → Messenger → Web → Content, you can customize the spaces that appear to your customers. Choose whether you want the Messenger to launch straight into a conversation with Fin, or to show a Home screen first. The experience can be tailored differently for users and visitors. Read more about Spaces on the Help Center.

Under Settings → Messenger → Web → Appearance, you can adjust the appearance of your Messenger to express your brand and the customer experience you want to create.

Messenger appearance settings in Intercom

Six settings control the Messenger style:

  • Messenger theme: choose light, dark, or match system (follows the customer’s device preference)
  • Primary color: used in buttons, links, message bubbles, and more to highlight key elements
  • Home Screen logo: add a PNG, JPG, or GIF for the Messenger Home header (may be resized to fit)
  • Launcher logo: shown on the Messenger launcher button. Square images (72x72px) with transparent backgrounds work best
  • Home Screen background: choose between a solid color, gradient, or uploaded image
  • Header text color: set to black or white depending on your background choice

Match these to your existing brand guidelines so that the Messenger feels like an integral part of your website.

Import your style directly from your website

If your workspace was created after December 2023, you can use the Import your style option to automatically pull your brand logo and colors from your website. Enter your domain, click Import, and Intercom will detect your brand colors and logo for you.

Import your style option in Messenger settings


Step 4: Configure Fin’s identity

You can change Fin’s default identity to make it part of your own brand. Go to Fin AI Agent → General → Fin settings.

Here you can change Fin’s name and avatar to reflect your brand. This is the name and icon your customers see on every message Fin sends.

Fin name and avatar settings

A practical tip: make sure the avatar contrasts well with your chosen Messenger background color.

AI Agent label: This toggle controls whether a label appears below each message Fin sends, indicating it was AI-generated. It is on by default for new customers, and in most cases you should leave it on. Learn more about AI disclosure on the Help Center.

If you’re running multiple brands: each brand can have its own Fin name, avatar, and Messenger appearance. If no brand-specific identity is configured, Fin falls back to your workspace default.


Step 5: Test before going live

Preview the Messenger and run an internal test before you set it live for customers.

Preview

Use the interactive preview at Fin AI Agent → Deploy → Chat. This lets you send test messages and see exactly how Fin responds in the actual Messenger interface.

Fin AI Agent preview in the Messenger

Check:

  • Fin answers your most common questions accurately
  • The escalation path works (test a scenario that should hand off to a human)
  • The name, avatar, and colors are appearing as expected
  • The AI Agent label is showing (if enabled)

Internal test

Then, run an internal test. Set your audience rules to target teammates only. The most common approach: use an audience condition where email contains @yourcompany.com. This limits the live Messenger to people on your team while you verify the experience.

Audience rule filtering by email domain for internal testing


Resources


What’s next?

Your Messenger is installed, secured, branded, and tested. Now it’s time to keep building out the rest of your helpdesk.

Continue the course...

Keep setting up your AI-first helpdesk, from connecting email to optimizing your knowledge base and beyond.
πŸ‘‰ Setting up your AI-first helpdesk
